
Home Improvement

How to Insulate an Attic

Learn how to insulate an attic safely and effectively, from air-sealing and choosing insulation to protecting ventilation and finishing an attic hatch.
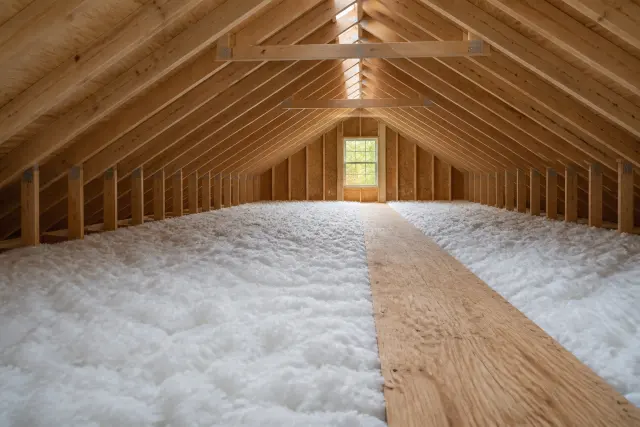
Clean unfinished attic with evenly installed floor insulation and a safe walkway.

Introduction

Learning how to insulate an attic can make a home more comfortable in every season. In winter, insulation slows heat loss through the ceiling. In summer, it reduces the heat moving from a hot roof and attic into the living space below. The best results come from treating the attic as a system: seal air leaks first, install the right amount of insulation, and preserve ventilation where the roof assembly needs it.

Many unfinished attics can be improved by a careful homeowner, especially when the work involves topping up accessible floor insulation. However, attics can contain unsafe wiring, fragile ceiling surfaces, moisture damage, pests, or materials that need professional handling. This guide explains how to assess the space, choose a method, and work safely without blocking the details that keep the roof and home healthy.
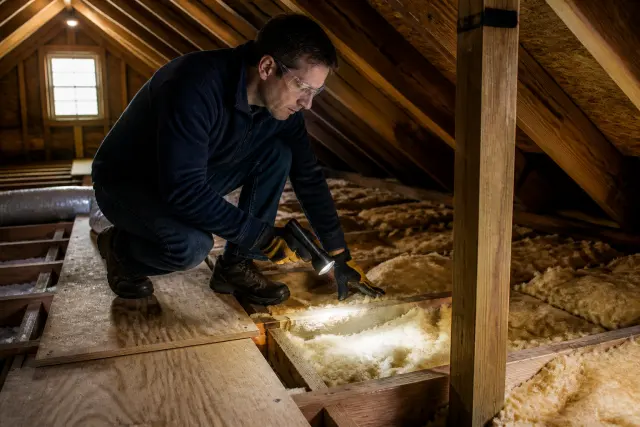
Homeowner safely inspecting existing insulation and framing in an attic.
Inspect for moisture, pests, and safe footing before starting insulation work.

1. Inspect the Attic Before You Buy Insulation

Start on a dry day with a bright work light, gloves, a dust mask or respirator appropriate to the material, knee protection, and sturdy boards for walking. Never step between ceiling joists. Drywall or plaster below will not support your weight, so place plywood or purpose-made walk boards across joists when you need a stable route.

Look for water staining, wet insulation, mold-like growth, roof leaks, pest activity, disconnected ducts, and exposed electrical concerns. Insulation should not be installed over an active moisture problem. Find and repair the cause first, whether it is a roof leak, plumbing leak, bathroom fan venting into the attic, or condensation from inadequate air sealing.

Identify the attic type

Most homes have a vented, unfinished attic where insulation belongs on the attic floor, directly above the conditioned rooms. If your attic contains finished living space, heating and cooling equipment, or ducts that must remain within the conditioned envelope, the correct insulation location may be along the roofline or walls instead. That approach involves different moisture and fire-safety details and is often best designed by a qualified insulation or building professional.

Check the existing insulation

Measure existing insulation depth in several locations, avoiding compressed areas. Note whether it is loose-fill, fiberglass batts, mineral wool, or another material. Dry, clean existing insulation can often remain in place while new insulation is added. Remove insulation that is wet, heavily contaminated by pests, or suspected of containing hazardous material; homes built before modern material restrictions may require testing and specialized removal rather than DIY disturbance.

2. Choose an Insulation Material and Target Level

Attic insulation is usually selected by its R-value, which describes resistance to heat flow. Your appropriate total attic R-value depends on your climate zone, the existing assembly, and local code requirements. Colder climates generally call for more attic insulation than warm climates. Local building departments can confirm requirements for permitted remodels, and insulation product packaging lists both R-value and the installed thickness needed to achieve it.

For an open attic floor, loose-fill cellulose or fiberglass is often practical for adding depth across broad areas. Batts or rolls can work well in regular, open joist bays, particularly for a small project. Mineral wool batts resist heat and are easier to fit around some obstructions, but they are typically more labor-intensive across a large attic. Do not assume a thicker-looking material provides more R-value; compare the labeled R-value at the intended installed depth.

Match the material to the job

  • Loose-fill insulation: Efficient for topping up irregular attics and filling around framing, but requires careful depth control and a blower machine.
  • Fiberglass batts: Convenient for accessible cavities, provided they can be installed full-depth, uncompressed, and without gaps.
  • Mineral wool batts: Dense, friction-fit panels that can be useful around framing and equipment clearances.
  • Spray foam: A specialized option for certain roofline assemblies; it changes attic moisture and ventilation behavior and should be planned carefully.
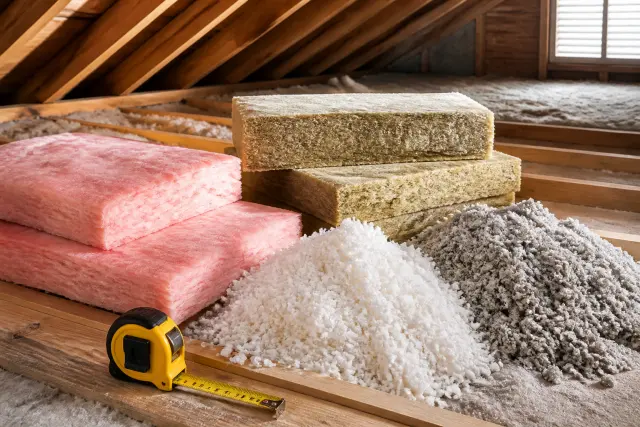
Several attic insulation material options arranged near exposed ceiling joists.
Select insulation by the assembly, installation method, and labeled R-value rather than appearance alone.

3. Calculate Coverage, Depth, and Materials

Measure the attic floor length and width to estimate square footage, then subtract only large areas that will not receive insulation. For loose-fill products, use the manufacturer’s coverage chart, not a generic volume estimate. The chart tells you how many bags are needed for your target R-value over a given area and specifies the settled thickness to maintain.

For batts, choose widths that fit your joist spacing and buy enough linear coverage for each bay. Add a modest allowance for cutting around framing and obstacles. If you are adding over existing batts, place the new layer perpendicular to the joists when practical. This helps cover wood joists, which conduct heat more readily than insulation, and reduces continuous gaps between batt edges.

Plan access and storage first

Decide how you will keep access to junction boxes, mechanical equipment, and the attic hatch. If storage is essential, build a raised platform above the final insulation level rather than compressing insulation beneath boards. Compressed insulation loses effectiveness, and a low platform can prevent you from reaching the depth needed for the desired R-value.

4. Air-Seal the Ceiling Plane Before Insulating

Insulation slows heat transfer, but it does not reliably stop moving air. Warm indoor air can escape through small openings into the attic during cold weather, carrying moisture with it. In hot weather, attic air can also enter the home through gaps. Air sealing is therefore one of the most important parts of an attic insulation project.

Pull insulation back from the work area and seal accessible gaps around plumbing pipes, electrical penetrations, wiring holes, top plates, duct boots, and open chases. Use a compatible caulk or low-expansion foam for small openings. Larger gaps may need a rigid, noncombustible, or otherwise code-appropriate backing and sealant. Keep required service access available, and do not bury electrical junction boxes under insulation where they cannot be found.

Respect heat sources and flues

Recessed lights, chimneys, flues, and vents need special attention. Some recessed fixtures are rated for direct insulation contact, while others require clearance; read the fixture label and follow local requirements. Chimneys and certain vent pipes require approved, noncombustible clearances and fireblocking details. Never pack standard insulation against a hot flue or make assumptions based on appearance. When in doubt, ask a licensed electrician, HVAC contractor, chimney professional, or local inspector.
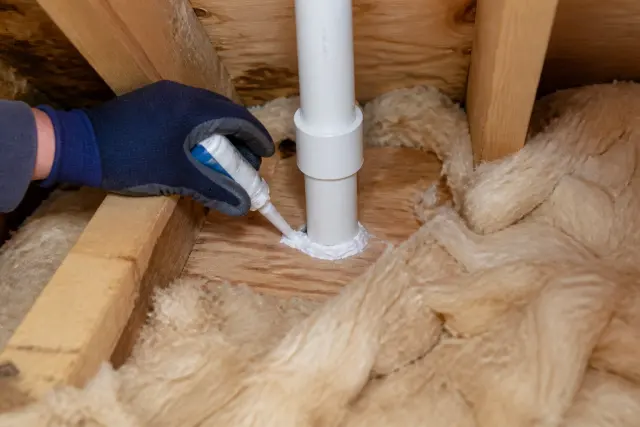
Gloved homeowner air-sealing a plumbing penetration in an attic floor.
Air-sealing accessible ceiling penetrations helps insulation perform more effectively.

5. Prepare for Safe, Even Installation

Before bringing insulation into the attic, protect the areas that must remain clear. Install attic baffles at each soffit bay in a vented attic so insulation cannot drift into the soffits and block airflow. Mark the location of the attic hatch, junction boxes, and other service points. For loose-fill insulation, install depth rulers throughout the attic where they can be seen from the access point.

Use protective clothing that covers your skin, eye protection, gloves, and a respirator or mask recommended by the insulation manufacturer. Keep the attic well lit, but do not overload extension cords or leave them where they can create a trip hazard. Work with a helper whenever possible: one person can feed a blower while the other directs the hose, communicates around obstacles, and watches footing.

Protect ducts and bath fans

Seal disconnected or leaky ductwork before covering the attic floor, then insulate ducts as appropriate for the system and climate. Bathroom exhaust fans should discharge outdoors through a properly installed roof or wall termination, not into the attic. Covering a duct leak or vent problem with insulation only hides it and can worsen condensation, indoor air quality, and roof moisture issues.

6. Install Batts or Loose-Fill Without Gaps

For batts, begin at the perimeter and work back toward the attic opening. Fit each piece snugly between or over joists without stuffing it into place. Cut around pipes, wiring, and framing so insulation fills the space rather than leaving voids. Split batts around wiring when possible instead of laying the entire batt on one side, which can create an uninsulated channel.

For loose-fill insulation, start at the farthest edges and work toward the hatch so you do not trample the newly installed layer. Keep the blower hose low and sweep it steadily for even coverage. Use the installed-depth markings on the product bag and your depth rulers. Avoid creating high mounds near the access point and thin spots at exterior edges, which are common sources of uneven performance.

Do not compress or conceal key components

Maintain the full intended thickness of the product. Avoid placing storage boxes, flooring, or heavy objects directly on top of loose-fill or fluffy batts. Keep insulation clear of equipment that requires service space and preserve access to electrical boxes. If a service person must enter the attic regularly, make a durable, clearly defined walkway rather than repeatedly crushing a path through the insulation.
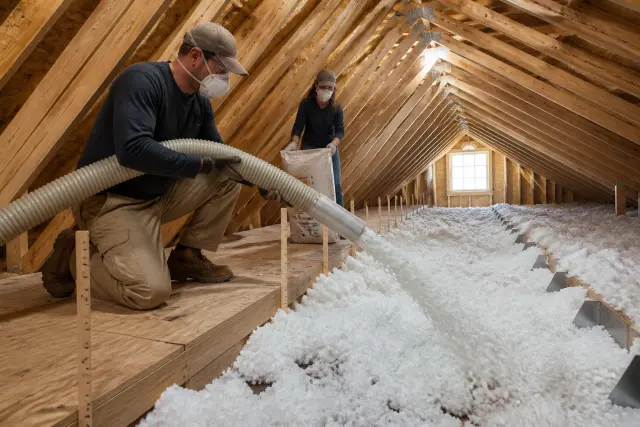
Two people safely installing loose-fill insulation across an attic floor.
For loose-fill insulation, work from the far edge back toward the attic opening.

7. Insulate and Air-Seal the Attic Hatch

An uninsulated attic hatch can undermine an otherwise thorough project. Treat it like a small exterior door in the ceiling plane. Add weatherstripping around the opening so the hatch closes against a continuous seal. Then attach rigid foam board or another suitable insulation layer to the attic side of the hatch, taking care that it does not interfere with closing or create a loose, falling panel.

For a pull-down stair, an insulated cover box or tent placed over the stair opening from the attic side is often more effective than trying to insulate the folding assembly itself. Choose a cover that allows safe operation and does not interfere with wiring or nearby fixtures. If the access is in a garage, confirm any required fire-resistance separation details with your local building department before making changes.

8. Preserve Ventilation and Manage Moisture

A traditional vented attic needs a clear route for outdoor air to move from intake vents, commonly at soffits, toward exhaust vents at the ridge or high on the roof. Insulation belongs on the attic floor, while baffles maintain an open air channel at the eaves. Do not cover soffit vents with loose-fill insulation, batts, bags, or debris.

Ventilation is not a substitute for air sealing. If warm, humid household air leaks into a cold attic, it can condense on roof sheathing even when vents are present. Air-seal ceiling penetrations, use kitchen and bathroom exhaust fans correctly, and address unusually high indoor humidity. During periodic attic checks, look for frosty nails, damp sheathing, musty odors, or insulation that appears wet or matted.

Consider regional conditions

In cold and mixed climates, air sealing is especially important for limiting winter condensation. In hot-humid regions, ductwork and air-conditioning equipment in the attic can introduce additional comfort and moisture concerns. Roof design, vapor-control layers, and local practices vary by region, so a contractor familiar with your climate zone can be valuable when moisture issues, roofline insulation, or major HVAC changes are involved.
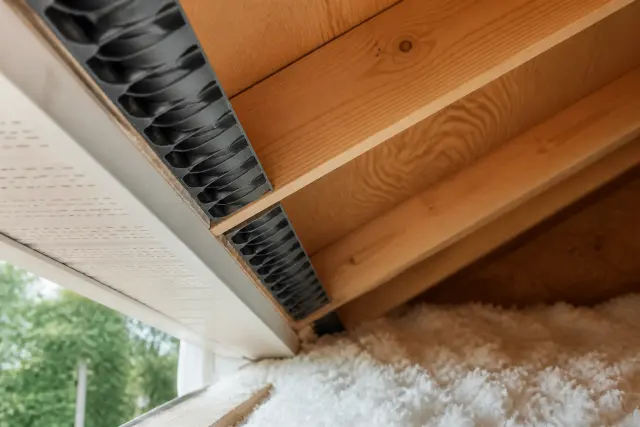
Attic baffles preserving airflow above insulation at the soffit.
Baffles prevent insulation from blocking soffit intake ventilation.

9. Know When to Call a Professional and Complete the Job

Call a qualified professional if you find widespread mold-like growth, extensive rodent contamination, damaged electrical wiring, recurring roof leaks, vermiculite-like material, or a combustion appliance venting through the attic. Professional advice is also wise for spray foam, cathedral ceilings, unvented roof assemblies, complicated duct systems, and any project requiring permits or code interpretation.

Before closing up, photograph service locations and record the insulation product, labeled R-value, bag count or coverage, and installation date. Check whether your jurisdiction requires permits or inspections, especially if work affects electrical equipment, fireblocking, ventilation, or an attic conversion. Requirements differ among states, counties, and cities, so your local building department is the right source for project-specific rules.

Make attic insulation part of regular maintenance

Inspect the attic at least seasonally and after major roof leaks or storms. Look for shifted insulation, blocked baffles, animal nesting, wet spots, and damaged duct connections. A quick inspection helps you catch problems while they are small and protects the effort you put into insulating the space.
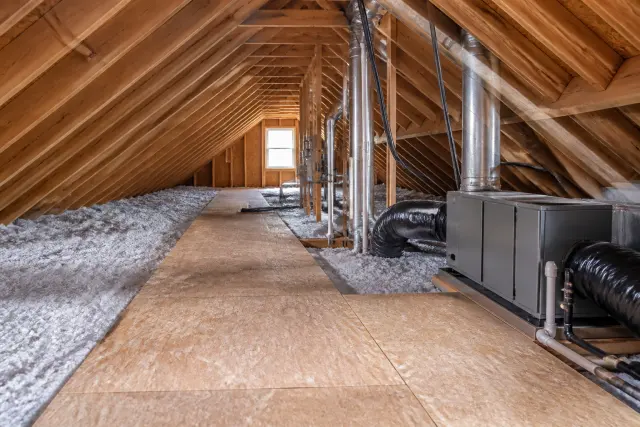
Raised attic walkway providing access above deep insulation.
A raised walkway protects insulation while maintaining access for maintenance.

After the installation, restore safe access rather than trying to make the whole attic a storage room. Keep a clear path to equipment and labeled service points, and avoid placing loose belongings over insulation. A simple map near the hatch can help future homeowners and service professionals find essential components without disturbing the entire attic floor.

Finally, pay attention to how the home performs through the next heating and cooling season. More even room temperatures, fewer drafts, and reduced strain on heating and cooling equipment can indicate that the work is helping. If comfort problems persist, consider an energy assessment to identify other air leaks, duct defects, window issues, or insulation gaps elsewhere in the house.
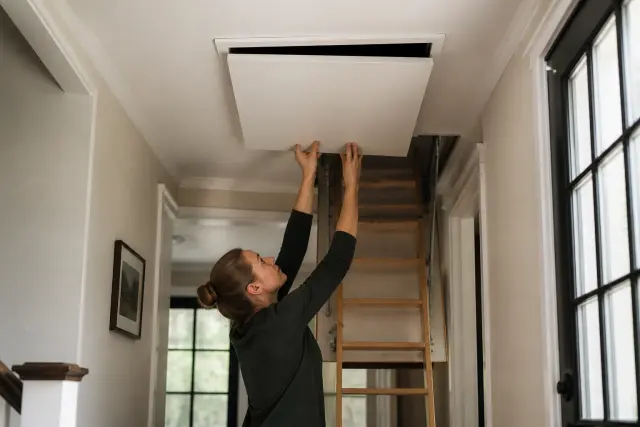
Homeowner closing an insulated and weatherstripped attic hatch.
Finishing the attic hatch helps complete the home’s insulated ceiling boundary.

Conclusion

Knowing how to insulate an attic means more than adding material until the space looks full. A successful project begins with a dry, safe attic; seals leaks in the ceiling plane; uses the right insulation depth for the home and climate; and leaves ventilation, access, and required clearances intact. Work methodically, follow product instructions and local requirements, and bring in a professional when the attic has moisture, electrical, combustion, or roofline complications. Done well, attic insulation is a durable upgrade that supports year-round comfort and easier home maintenance.

Frequently Asked Questions

Can I put new attic insulation over old insulation?

Usually, yes. Clean, dry insulation without significant pest contamination can often stay in place. Air-seal accessible ceiling gaps first, then add compatible insulation without compressing the existing layer. Remove wet or contaminated material and correct the cause before reinsulating.

Should I use faced or unfaced batts in an attic?

For adding insulation over existing attic-floor insulation, unfaced batts are commonly used. Facing placement and vapor-control needs depend on the assembly and climate, so do not add a vapor retarder in the wrong location. Follow local code and product directions, especially when building a new ceiling assembly.

How deep should attic insulation be?

The needed depth depends on the insulation type and the total R-value appropriate for your climate zone. Use the manufacturer’s chart for the exact product because equal depths of different materials can have different R-values. Local code officials can clarify requirements for your area.

Can insulation cover attic wiring?

Insulation may be installed around many properly installed electrical cables, but electrical junction boxes must remain accessible. Do not cover damaged wiring, use insulation to hide electrical defects, or ignore required clearances around fixtures and heat-producing equipment. Have questionable wiring evaluated by a licensed electrician.

Will attic insulation stop ice dams?

Proper air sealing and insulation can reduce heat loss that contributes to uneven roof melting, but they are not a guaranteed cure for every ice dam. Roof design, snow conditions, ventilation, air leaks, and drainage all matter. Repeated ice dams may warrant an evaluation by a roofing or building-performance professional.

Do I need attic ventilation if I add insulation?

Most traditional vented attics should retain their designed intake and exhaust ventilation. Install baffles at soffits so insulation does not block airflow. However, ventilation strategy differs for unvented roof assemblies, which should be planned as a complete system rather than modified casually.

Home Improvement

How to Insulate an Attic

Learn how to insulate an attic safely and effectively, from air-sealing and choosing insulation to protecting ventilation and finishing an attic hatch.

Clean unfinished attic with evenly installed floor insulation and a safe walkway.

Introduction

Learning how to insulate an attic can make a home more comfortable in every season. In winter, insulation slows heat loss through the ceiling. In summer, it reduces the heat moving from a hot roof and attic into the living space below. The best results come from treating the attic as a system: seal air leaks first, install the right amount of insulation, and preserve ventilation where the roof assembly needs it.

Many unfinished attics can be improved by a careful homeowner, especially when the work involves topping up accessible floor insulation. However, attics can contain unsafe wiring, fragile ceiling surfaces, moisture damage, pests, or materials that need professional handling. This guide explains how to assess the space, choose a method, and work safely without blocking the details that keep the roof and home healthy.

Homeowner safely inspecting existing insulation and framing in an attic.
Inspect for moisture, pests, and safe footing before starting insulation work.

1. Inspect the Attic Before You Buy Insulation

Start on a dry day with a bright work light, gloves, a dust mask or respirator appropriate to the material, knee protection, and sturdy boards for walking. Never step between ceiling joists. Drywall or plaster below will not support your weight, so place plywood or purpose-made walk boards across joists when you need a stable route.

Look for water staining, wet insulation, mold-like growth, roof leaks, pest activity, disconnected ducts, and exposed electrical concerns. Insulation should not be installed over an active moisture problem. Find and repair the cause first, whether it is a roof leak, plumbing leak, bathroom fan venting into the attic, or condensation from inadequate air sealing.

Identify the attic type

Most homes have a vented, unfinished attic where insulation belongs on the attic floor, directly above the conditioned rooms. If your attic contains finished living space, heating and cooling equipment, or ducts that must remain within the conditioned envelope, the correct insulation location may be along the roofline or walls instead. That approach involves different moisture and fire-safety details and is often best designed by a qualified insulation or building professional.

Check the existing insulation

Measure existing insulation depth in several locations, avoiding compressed areas. Note whether it is loose-fill, fiberglass batts, mineral wool, or another material. Dry, clean existing insulation can often remain in place while new insulation is added. Remove insulation that is wet, heavily contaminated by pests, or suspected of containing hazardous material; homes built before modern material restrictions may require testing and specialized removal rather than DIY disturbance.

2. Choose an Insulation Material and Target Level

Attic insulation is usually selected by its R-value, which describes resistance to heat flow. Your appropriate total attic R-value depends on your climate zone, the existing assembly, and local code requirements. Colder climates generally call for more attic insulation than warm climates. Local building departments can confirm requirements for permitted remodels, and insulation product packaging lists both R-value and the installed thickness needed to achieve it.

For an open attic floor, loose-fill cellulose or fiberglass is often practical for adding depth across broad areas. Batts or rolls can work well in regular, open joist bays, particularly for a small project. Mineral wool batts resist heat and are easier to fit around some obstructions, but they are typically more labor-intensive across a large attic. Do not assume a thicker-looking material provides more R-value; compare the labeled R-value at the intended installed depth.

Match the material to the job

  • Loose-fill insulation: Efficient for topping up irregular attics and filling around framing, but requires careful depth control and a blower machine.
  • Fiberglass batts: Convenient for accessible cavities, provided they can be installed full-depth, uncompressed, and without gaps.
  • Mineral wool batts: Dense, friction-fit panels that can be useful around framing and equipment clearances.
  • Spray foam: A specialized option for certain roofline assemblies; it changes attic moisture and ventilation behavior and should be planned carefully.
Several attic insulation material options arranged near exposed ceiling joists.
Select insulation by the assembly, installation method, and labeled R-value rather than appearance alone.

3. Calculate Coverage, Depth, and Materials

Measure the attic floor length and width to estimate square footage, then subtract only large areas that will not receive insulation. For loose-fill products, use the manufacturer’s coverage chart, not a generic volume estimate. The chart tells you how many bags are needed for your target R-value over a given area and specifies the settled thickness to maintain.

For batts, choose widths that fit your joist spacing and buy enough linear coverage for each bay. Add a modest allowance for cutting around framing and obstacles. If you are adding over existing batts, place the new layer perpendicular to the joists when practical. This helps cover wood joists, which conduct heat more readily than insulation, and reduces continuous gaps between batt edges.

Plan access and storage first

Decide how you will keep access to junction boxes, mechanical equipment, and the attic hatch. If storage is essential, build a raised platform above the final insulation level rather than compressing insulation beneath boards. Compressed insulation loses effectiveness, and a low platform can prevent you from reaching the depth needed for the desired R-value.

4. Air-Seal the Ceiling Plane Before Insulating

Insulation slows heat transfer, but it does not reliably stop moving air. Warm indoor air can escape through small openings into the attic during cold weather, carrying moisture with it. In hot weather, attic air can also enter the home through gaps. Air sealing is therefore one of the most important parts of an attic insulation project.

Pull insulation back from the work area and seal accessible gaps around plumbing pipes, electrical penetrations, wiring holes, top plates, duct boots, and open chases. Use a compatible caulk or low-expansion foam for small openings. Larger gaps may need a rigid, noncombustible, or otherwise code-appropriate backing and sealant. Keep required service access available, and do not bury electrical junction boxes under insulation where they cannot be found.

Respect heat sources and flues

Recessed lights, chimneys, flues, and vents need special attention. Some recessed fixtures are rated for direct insulation contact, while others require clearance; read the fixture label and follow local requirements. Chimneys and certain vent pipes require approved, noncombustible clearances and fireblocking details. Never pack standard insulation against a hot flue or make assumptions based on appearance. When in doubt, ask a licensed electrician, HVAC contractor, chimney professional, or local inspector.

Gloved homeowner air-sealing a plumbing penetration in an attic floor.
Air-sealing accessible ceiling penetrations helps insulation perform more effectively.

5. Prepare for Safe, Even Installation

Before bringing insulation into the attic, protect the areas that must remain clear. Install attic baffles at each soffit bay in a vented attic so insulation cannot drift into the soffits and block airflow. Mark the location of the attic hatch, junction boxes, and other service points. For loose-fill insulation, install depth rulers throughout the attic where they can be seen from the access point.

Use protective clothing that covers your skin, eye protection, gloves, and a respirator or mask recommended by the insulation manufacturer. Keep the attic well lit, but do not overload extension cords or leave them where they can create a trip hazard. Work with a helper whenever possible: one person can feed a blower while the other directs the hose, communicates around obstacles, and watches footing.

Protect ducts and bath fans

Seal disconnected or leaky ductwork before covering the attic floor, then insulate ducts as appropriate for the system and climate. Bathroom exhaust fans should discharge outdoors through a properly installed roof or wall termination, not into the attic. Covering a duct leak or vent problem with insulation only hides it and can worsen condensation, indoor air quality, and roof moisture issues.

6. Install Batts or Loose-Fill Without Gaps

For batts, begin at the perimeter and work back toward the attic opening. Fit each piece snugly between or over joists without stuffing it into place. Cut around pipes, wiring, and framing so insulation fills the space rather than leaving voids. Split batts around wiring when possible instead of laying the entire batt on one side, which can create an uninsulated channel.

For loose-fill insulation, start at the farthest edges and work toward the hatch so you do not trample the newly installed layer. Keep the blower hose low and sweep it steadily for even coverage. Use the installed-depth markings on the product bag and your depth rulers. Avoid creating high mounds near the access point and thin spots at exterior edges, which are common sources of uneven performance.

Do not compress or conceal key components

Maintain the full intended thickness of the product. Avoid placing storage boxes, flooring, or heavy objects directly on top of loose-fill or fluffy batts. Keep insulation clear of equipment that requires service space and preserve access to electrical boxes. If a service person must enter the attic regularly, make a durable, clearly defined walkway rather than repeatedly crushing a path through the insulation.

Two people safely installing loose-fill insulation across an attic floor.
For loose-fill insulation, work from the far edge back toward the attic opening.

7. Insulate and Air-Seal the Attic Hatch

An uninsulated attic hatch can undermine an otherwise thorough project. Treat it like a small exterior door in the ceiling plane. Add weatherstripping around the opening so the hatch closes against a continuous seal. Then attach rigid foam board or another suitable insulation layer to the attic side of the hatch, taking care that it does not interfere with closing or create a loose, falling panel.

For a pull-down stair, an insulated cover box or tent placed over the stair opening from the attic side is often more effective than trying to insulate the folding assembly itself. Choose a cover that allows safe operation and does not interfere with wiring or nearby fixtures. If the access is in a garage, confirm any required fire-resistance separation details with your local building department before making changes.

8. Preserve Ventilation and Manage Moisture

A traditional vented attic needs a clear route for outdoor air to move from intake vents, commonly at soffits, toward exhaust vents at the ridge or high on the roof. Insulation belongs on the attic floor, while baffles maintain an open air channel at the eaves. Do not cover soffit vents with loose-fill insulation, batts, bags, or debris.

Ventilation is not a substitute for air sealing. If warm, humid household air leaks into a cold attic, it can condense on roof sheathing even when vents are present. Air-seal ceiling penetrations, use kitchen and bathroom exhaust fans correctly, and address unusually high indoor humidity. During periodic attic checks, look for frosty nails, damp sheathing, musty odors, or insulation that appears wet or matted.

Consider regional conditions

In cold and mixed climates, air sealing is especially important for limiting winter condensation. In hot-humid regions, ductwork and air-conditioning equipment in the attic can introduce additional comfort and moisture concerns. Roof design, vapor-control layers, and local practices vary by region, so a contractor familiar with your climate zone can be valuable when moisture issues, roofline insulation, or major HVAC changes are involved.

Attic baffles preserving airflow above insulation at the soffit.
Baffles prevent insulation from blocking soffit intake ventilation.

9. Know When to Call a Professional and Complete the Job

Call a qualified professional if you find widespread mold-like growth, extensive rodent contamination, damaged electrical wiring, recurring roof leaks, vermiculite-like material, or a combustion appliance venting through the attic. Professional advice is also wise for spray foam, cathedral ceilings, unvented roof assemblies, complicated duct systems, and any project requiring permits or code interpretation.

Before closing up, photograph service locations and record the insulation product, labeled R-value, bag count or coverage, and installation date. Check whether your jurisdiction requires permits or inspections, especially if work affects electrical equipment, fireblocking, ventilation, or an attic conversion. Requirements differ among states, counties, and cities, so your local building department is the right source for project-specific rules.

Make attic insulation part of regular maintenance

Inspect the attic at least seasonally and after major roof leaks or storms. Look for shifted insulation, blocked baffles, animal nesting, wet spots, and damaged duct connections. A quick inspection helps you catch problems while they are small and protects the effort you put into insulating the space.

Raised attic walkway providing access above deep insulation.
A raised walkway protects insulation while maintaining access for maintenance.

After the installation, restore safe access rather than trying to make the whole attic a storage room. Keep a clear path to equipment and labeled service points, and avoid placing loose belongings over insulation. A simple map near the hatch can help future homeowners and service professionals find essential components without disturbing the entire attic floor.

Finally, pay attention to how the home performs through the next heating and cooling season. More even room temperatures, fewer drafts, and reduced strain on heating and cooling equipment can indicate that the work is helping. If comfort problems persist, consider an energy assessment to identify other air leaks, duct defects, window issues, or insulation gaps elsewhere in the house.

Frequently Asked Questions

Can I put new attic insulation over old insulation?

Usually, yes. Clean, dry insulation without significant pest contamination can often stay in place. Air-seal accessible ceiling gaps first, then add compatible insulation without compressing the existing layer. Remove wet or contaminated material and correct the cause before reinsulating.

Should I use faced or unfaced batts in an attic?

For adding insulation over existing attic-floor insulation, unfaced batts are commonly used. Facing placement and vapor-control needs depend on the assembly and climate, so do not add a vapor retarder in the wrong location. Follow local code and product directions, especially when building a new ceiling assembly.

How deep should attic insulation be?

The needed depth depends on the insulation type and the total R-value appropriate for your climate zone. Use the manufacturer’s chart for the exact product because equal depths of different materials can have different R-values. Local code officials can clarify requirements for your area.

Can insulation cover attic wiring?

Insulation may be installed around many properly installed electrical cables, but electrical junction boxes must remain accessible. Do not cover damaged wiring, use insulation to hide electrical defects, or ignore required clearances around fixtures and heat-producing equipment. Have questionable wiring evaluated by a licensed electrician.

Will attic insulation stop ice dams?

Proper air sealing and insulation can reduce heat loss that contributes to uneven roof melting, but they are not a guaranteed cure for every ice dam. Roof design, snow conditions, ventilation, air leaks, and drainage all matter. Repeated ice dams may warrant an evaluation by a roofing or building-performance professional.

Do I need attic ventilation if I add insulation?

Most traditional vented attics should retain their designed intake and exhaust ventilation. Install baffles at soffits so insulation does not block airflow. However, ventilation strategy differs for unvented roof assemblies, which should be planned as a complete system rather than modified casually.

Homeowner closing an insulated and weatherstripped attic hatch.
Finishing the attic hatch helps complete the home’s insulated ceiling boundary.

Conclusion

Knowing how to insulate an attic means more than adding material until the space looks full. A successful project begins with a dry, safe attic; seals leaks in the ceiling plane; uses the right insulation depth for the home and climate; and leaves ventilation, access, and required clearances intact. Work methodically, follow product instructions and local requirements, and bring in a professional when the attic has moisture, electrical, combustion, or roofline complications. Done well, attic insulation is a durable upgrade that supports year-round comfort and easier home maintenance.